
Comprehensive Installation, Maintenance, and Troubleshooting Guide for Trench Heaters

Trench Heaters: Comprehensive Installation, Maintenance, and Troubleshooting Guide
Trench heaters are heating systems integrated into the floor, combining aesthetics and functionality in modern architecture. Especially in areas with large glass surfaces, they prevent heat loss and condensation caused by cold, offering superior thermal comfort and energy efficiency.
Trench heater installation is a process that requires proper planning and precision for the system to operate efficiently. In this article, we will examine how this process should be, step by step.
Preparations and Planning Before Installation
It should be decided whether the convector will be the main heat source or an auxiliary heater, and the correct model and length should be determined by considering the heat loss in the room and the length of the glass surface. The channel opened for installation should be 50 mm larger than the trench heater casing in all directions, and the height of the grille should be flush with the finished floor. Plumbing arrangements should be made for water and electrical connections.
The use of convectors is possible in projects with raised floors. In these applications, since there is no fixed structure surrounding the convector, it is recommended to cover the bottom of the convector casing with acoustic insulation material before installation. The covering material can be single-sided adhesive rubber sponges. This provides both sound insulation and increases system performance.
Installation Steps
1. Channel Preparation:
- If the screed has already been laid, the floor is broken to create an appropriate channel space. (50 mm larger than the convector dimensions)
- If the screed has not been laid, the channel spaces are adjusted with wooden borders before screeding, or styrofoam cut to the size of the space is fixed before screeding. They are removed after screeding.
- IMPORTANT: Before screeding, the water line and electrical line must be extended to the installation channels.
- Before screeding, the convectors can be fixed in place, and screeding can also be done. In such applications, great care must be taken to prevent screed or similar dirt from entering the device and to prevent damage to the casing.
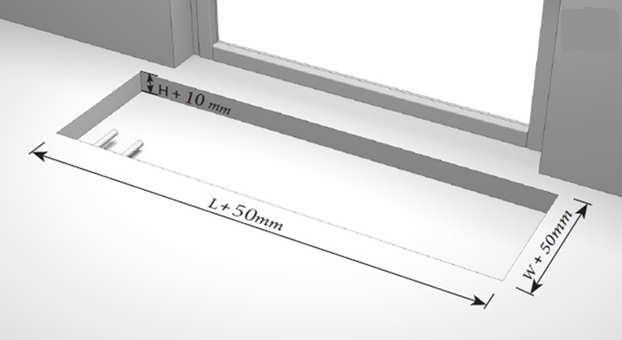
2. Casing Center Support Check: The part installed in the middle of the convector casing to maintain its shape should be checked to ensure it is in place.
IMPORTANT: If screed is poured around the convector without this center strip, the screed may slightly expand as it dries, pressing and narrowing the convector casings in their middle sections. Later, during grille installation, the grilles may not fit into the casing. For this reason, the presence of the rigid strip in the middle of the convector should be checked before screeding or thin screeding.
3. Placement and Level Adjustment: The convector is placed, and the convector height is determined, taking into account the floor covering height. Then, the final adjustment is made using a spirit level to ensure it is perfectly horizontal.
4. Fixing: The convector casing is fixed to the floor. For this, the L-shaped fixing parts supplied with the device should be fixed to the 4 sides of the convector and screwed to the floor.

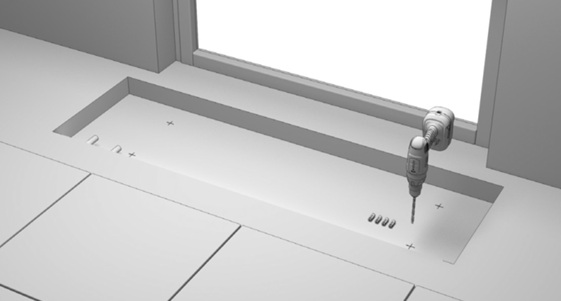
5.Pipe and Electrical Connections: Water connections are made with flexible hoses, and electrical connections are made according to diagrams.
6. Sealing and Bleeding: Connections are checked, and air in the system is discharged from the air vent.
7. Screed Application and Protection: Screed is poured around the convector, and it is covered with a protective lid.
Safety Precautions During Installation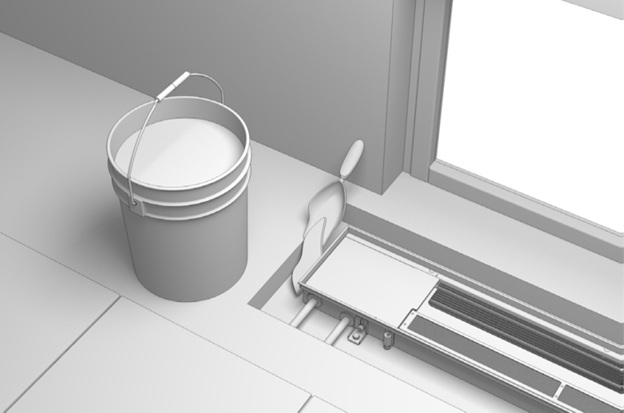
- Installation must be carried out by qualified personnel.
- Packaging should be kept in place and protected to prevent damage to the device on site.
- Fan convectors only operate with 24V DC.
- IMPORTANT: 230V or 24V AC power supply must not be used.
- Electrical parts must be protected from moisture. Heavy objects that could cause damage should not be placed on the grilles. It should not be stepped on during the construction period.

Trench Heater Maintenance: Tips for Long-lasting and Efficient Use
Although trench heaters require minimal maintenance, regular practices extend efficiency and device life. Repeating maintenance every six months will be sufficient.
Why is Regular Maintenance Important?
Regular maintenance improves efficiency by preventing dust accumulation, extends the life of the device, maintains indoor air quality, and enables early detection of potential problems.
How to Perform Periodic Cleaning?
- Grille Cleaning: Wipe with a damp cloth, do not use harsh chemicals.
- Casing and Heat Exchanger Cleaning: After removing the grille, the inside of the channel and the heat exchanger are cleaned with a vacuum cleaner. It is important that the fans do not get dirty during construction.
General Maintenance Checks
- Thermostat Control: Ensure it is set correctly and working.
- Does it receive fan speed change commands?
- Does the motorized valve open when the valve opening icon appears?
- For detailed adjustment and control, watch our thermostat videos: https://www.youtube.com/watch?v=924WawRMDcM&list=PLkyUxzx-1tW_i4ryLA4eBxJyPue-Zo_hH
- Airflow Obstructions: Check for obstructions at air inlets/outlets. If the fan wheel is blocked by any material, our motors go into protection mode and stop. They attempt to rotate every 6 seconds. If the blockage continues, they shut down and try again. This prevents damage to your motor due to blockage. However, this blockage must be removed within 72 hours.
- Leaks: Check hydraulic fluid levels and leaks. For cooled models, check the drainage pan.
- Motor connection checks: Motor electrical connections should be checked by an authorized electrical personnel. First, all electrical lines must be shut off, and then turned on after connections are re-made. This ensures both safety and prevents potential damage to the motor.
Safety Precautions During Maintenance
- Power Off: Before starting cleaning, the device's power must be cut off and allowed to cool down.
- Water and Electricity: Electrical parts must be protected from moisture, and water should not be poured into the device.
- Burn Risk: Avoid touching a running or hot device.
- Fan: Never open the device and intervene while the fan is running.
Common Problems and Solutions
Common problems that may be encountered in trench convectors and suggested solutions.
No Heating or Insufficient Heating Problems
Possible Causes:
- Incorrect thermostat setting,
- Valve being closed due to not receiving contact,
- Incorrect valve connection direction,
- Insufficient hot water boiler / low water flow/temperature,
- Air in the coil,
- Airflow obstructions,
- The installed convector's capacity not being sufficient to meet the heat loss of the space.
Solutions: Adjust the thermostat, check the valves, measure water temperature and check flow rate, bleed air from the coil using the air vent, check the boiler/power supply, remove any airflow obstructions.
Causes of Noisy Operation
Causes:
- If the inside of the convector casing was not sufficiently protected from external factors during installation, materials such as dirt, cement, plaster, or paint accumulating on the fan blades and motors can both disrupt balance and cause the fans to operate noisily.
- Wear may have occurred in the fan bearings due to many years of operation.
- The fan casing may have come out of its rubber mounting feet and be causing vibration in the casing.
- An object may have fallen onto the fan blades.
- If the convector is installed on a raised floor, vibration insulation may not have been applied under the casing.
- If the noise is not from the fan but from the coil; there may be air bubbles in the system.
- The water pressure in the system may be higher than planned.
Solutions: Clean the fan, check physically. Bleed air from the system.
Water Leaks and Remediation Methods
Causes: Heat exchanger leak, clogged drainage pan (cooling models), uninsulated cold water line, loose connections at connection points.
Solutions: Clean the drain, insulate the cold water line, seal the connections.
Trench heaters are innovative heating and cooling solutions that combine aesthetics and comfort in modern architecture. They provide energy efficiency by preventing heat loss and condensation in spaces with large glass surfaces. Correct installation and regular maintenance are critical for the system's long-lasting and efficient operation. While simple problems can be resolved by the user, it is best to seek professional help for complex malfunctions. These systems will continue to add value to living spaces with proper installation and maintenance.